In this post I will focus on defending the trips side of a 3x1 formation. There are certain considerations that need to be made when planning out a strategy for dealing with trips. Here is the good news, usually, defending 3x1 is much easier than defending 2x2 formations. The defenses that have trouble with 3x1 formations are usually defenses that prefer to play the game with balanced fronts/coverages (hence the discomfort with the overload that trips create) or don't understand that defending trips like anything else is a risk reward game. The defense cannot stop everything, every play. The goal is to have the defense in the best position to defend the most likely range of plays the offense can run in a particular situation. Lets look at some different options you can run towards trips.
Using these 4 options we can up with a plan for handling trips in a general strategy. I am not gonna get to much into the technique or scheme of each of these, the links provided offer that. The first thing to consider is disguise.
DISGUISE
Disguising coverage in football is done in 2 primary ways.
1. Stemming and Moving around constantly every play to the extent that the offense does not know what you are in pre-snap
2. Show the same look every-time and then stem to your coverage right before the snap.
Either approach can work, but I will discuss the 2nd because it will easier to explain, and in my opinion is easier to execute.
I like running 2-Solo, so I prefer to base my trips look out of that.
From this look you can stem and work into the other looks without much difficulty.
Lets look at the others.
Looking at these alignments it should be evident that there is not too much movement involved in the stemming of each.
Again these are simple examples, but even in their simplicity they can be difficult for the typical High School QB to read. The other disguise principal involves the movement of the SS. Since it is harder for the SS to align himself out of position, he can be the defenses most liberal person stemming. He can move around, show blitz, man, ect.
WHEN TO CALL WHAT
This comes down to game-planning. The generic rule is to understand the strengths and weaknesses of each coverage. Here is a simple list. It is not complete nor detailed, but sufficient to illustrate the point.
Ideally, the defense wants to be in a coverage that best defends what the offense is trying to do. If the defense expects run toward the trips, then 3-Mable or 2-Solo are best. If the defense is worried about middle and quick game, then cover 1 is the best bet. Finally, if the single WR is a concern, then special bracket is optimal.
No matter what trips coverages the defense has in its package, they need to be coordinated and planned. The best way to protect each one is to mix them up and have a sound disguise for them. This post was a simplistic look at disguising and calling different coverages to trips. If anyone has any questions about anything let me know in the comment section.
Sorry guys for not keeping up with my posts, I have been in transition. I am getting everything together, and should start getting some posts back up in the next week or two.
Some of the topics will be
*defending trips coverages, strategy, and technique (disguise) By Request
*Drills and Technique for coaching Safeties
*Man Coverage
If any of you have any suggestions please leave a comment, it is a lot easier to write posts when someone gives me some ideas of what people are interested in.
In this part, I will look at run fits and alignments versus Double Tight I formations. These are not hard fast rules and techniques. These are not always ideal given the talent or distribution of your players. This is just a base to work from that works the majority of the years. If you want more detail on basic alignment, look at this post.
ALIGNMENT
The call is TITE-2 SKY. The front can set the strength either way, the ideal situation is to have it set towards the WR side. However, you can't always count on that; motion will have jumping and shifting all over the place. The read side is normal, nothing has changed. The FS, SS, Corner, and front align like they versus regular pro-I. The away-side is where things change. The WS shifts to a tighter alignment (anywhere from 1x1 to 5x5; it really depends on the player) angled in 45 degrees. He is the force player. The corner is aligned 4-6 yards behind the DE. Finally the nose shifts to an inside shade on the guard versus the TE. (You could put the corner in force alignment and stack the WS behind the DE, all you would need to tag is TITE-2 Cloud)
The big change here is the play of the corner. The corner is pass conscious but as soon as he gets his read he is into the run fit. If you don't like your corners playing like this, you could personnel another backer/safety into the game or just run cloud on the back side.
The corner has a flat foot read of the TE. If pass shows he has him up and in. If he is out the WS will play him and the corner will gain depth. On run he is a fill player. He works inside out on runs to, and plays the cutback on runs way. You can't let the TE worry the corner too much, you need him active into the run fit. He is essentially a player that has linebacker type run fits, with corner coverage responsibilities. Again, find which player is best at this role.
You really have to get the corner confidence in this technique. You don't want the offense running the ball right at you, with the corner over a nub TE running backwards worried about a TE beating him on deep ball. However, if its third and long and the offense is still in double tight I, then the corner should know that he is not needed in the run fit as much, and can play more pass conscious
ISO STRONG
Isolation plays create an EXTRA GAP. To remain sound versus this play, the Defense will need to either have a player 2-gap or involve a secondary player in the run fit. This is where the corner playing cutback comes into the picture. When defending the ISO an important thing to consider is how the backers leverage the fullback. Brophy wrote an article about Bo Pelini's defense, and specifically the lever/spill/lever concept. This is one way to treat run fits. I have become a believer in the linebacker making good contact head up to across, and letting the other backer and cutback player, fill where needed. Carl Pelini mentioned the concept at clinic. He explained that offenses were getting better at scheming run-fits. To combat this his linebackers needed to change up the way they hit and leveraged fullbacks and other pullers.
In the diagram the Sam hits the fullback as close to LOS as possible. (If the backer cannot physically handle the fullback then cut him) The Mike will then fill off the Sam, and the corner will work to cutback. The FS will work downhill and fill off the linebacker. Finally the SS and WS will fold and play reverse to late pursuit. The FS and corner need to be aggressive about filling in the run. If the backers and D-line cannot stop the play themselves they should at least force the back to make a cut or two laterally, or cutback in the corner. Either way you want the FS/corner making a play on the back as close to the LOS as possible. If you allow the RB to get out of the hole and into open area at all, you corner/FS is stuck in an open field tackle situation. You are lucky to win those 70% of the time. Getting a tackle made close to the LOS is a higher percentage play.
A Side Note
Do you play the secondary this aggressively every play? No. You don't even do it every 1st down situation. You should do it a good amount of the time, but you need to mix in some more conservative pass coverages to keep the offense from play-passing you to death. In this particular call, the secondary should be alert to the game-plan, and that they need to be aggressive run players.
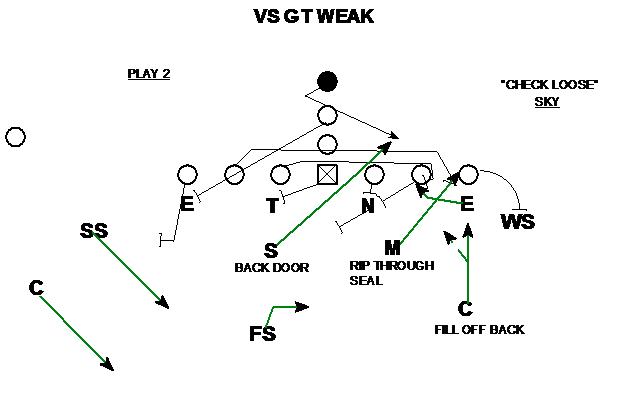
COUNTER WEAK
These fits apply to the counter GT and power plays. When planning for these types of plays, I try to simply them down into a concept for my players. So for simplicity I call these kick-seal plays. The PSDE will spill the ball (wrong arm the puller); he does not need to go to the ground just work inside the kick man. If this is done correctly the back will have to bounce the play a gap wider. Hopefully, the spill will deter the sealer and allow the backer to scrape off of the spilled kick player free to make the play. If the sealer works around the spill then the backer will need to fit up on him. The Mike needs to attack the sealer close to spill and rip across him. This action will turn the lineman's body and cloud the running lane for the back. The back will have to change direction to try to cut up in the small hole between the kicker and sealer or continue to bounce at an angle that's vulnerable to pursuit. The backs vision is clouded by having the backer rip across and turn the corner on the seal man.
The corner will work off the back. If he bounces or takes the inside route the corner needs to fly in there and fill. The back-side backer needs to avoid the double team on the nose. In circumstances like this I like this backer to work behind the double team and make the play in the backfield. (If the double team pushes the nose lateral, then the best thing for the Sam to do is work over the top.) Many times kick-seal scheme are stopped by the back side linebacker running through. Its hard for the offense to account for him. Ask O-line coaches that run the counter about it, they will tell you that the back side backer is the biggest problem for them.
On the backside of the D, the SS works to play reverse to late pursuit, and the FS will work and look for any cutback.
TOSS STRONG
The linemen can't get reached or put on the ground. The tackle, nose and BSDE need to work laterally down the line. The SS sets the edge at a good leverage angle and forces the back to cutback or bounce outside at an angle vulnerable to pursuit.
The play of the PSDE on the TE is key. If the O-line works a full zone like the picture above he needs to push vertical on the TE and stay square on him. He works in this position until he sees the O-tackle release inside. When this happens he can become a c-gap player again. If the tackle keeps working with the TE on him, he needs to slowly work to the D-gap and let the backer worry about the back cutting back inside. The Sam has to be similarly alert to a full zone. He needs to work to a position behind the DE. if he sees the DE work inside to the C, he works around him and the TE and fills.
The FS fills the alley inside out. If the defense executes these assignments there should be nowhere for the back to go. Two players should be hitting the hole unblocked. If the TE happens to work down and block the Sam, then the DE will be free to make play along with the FS.
CONCLUSION
Again there are different ways to do things, these are the way I like to play the power running game. It part III I will look at defending unbalanced and 3-back running formations. If any of you reading want me to look at some other formations and plays leave a comment and I will try to fit it in.
This is part I in a multi-part series. (Not sure how many yet.) In this part I will cover the basic principals to stopping the power running game with the 4-2-5. In part II, I will look at alignments and run fits/techniques versus double tight-I. In the part(s) I will cover unbalanced formations and adjustments like "Flip" and getting the safeties on the LOS to form solid fronts. (ie 4-3 under looks)
People new to the idea of using a 5 man secondary are skeptical, because it seems like it would be difficult to stop a power running team that uses bigger personnel. At times being smaller can put the D at a disadvantage, however, with proper game-planning and practice the 4-2-5 can become an excellent defense for stopping the power run.
I am going to cover some principals and show alignments with run fits versus different schemes. There are so many scenarios and play variations in football it would be impossible to cover them all. Understanding the principals and their applications to various formations in plays will put you on your way to using the 4-2-5 versus power running teams.
PRINCIPALS
1. Align Properly
This is the most important aspect in defending any offense. It is important that you not only align soundly, but align in a manner that the offense is not sure what you are doing.
2. Spill and Overlap
When using a defense based on smaller faster players, you have to keep the ball moving laterally. Having the DE's wrong-arm plays is a must. You could try to squeeze or box pulling plays, but if you run into a team stronger than you, big holes are going to open up.
3. Attack the play before it develops.
There are many things that go into this. If I had to break it down into separate parts, I would say:
-Be Aggressive about getting people to the point of attack. (Be willing to play the secondary on the run more aggressively.)
-Don't let the back hit the hole running full speed. (This is why the spill and overlap concept is a big part)
- Force the back to either dance or make a quick decision into a free defender.
4. Play to win the down and distance game
The other principals are developed from this one. You ideally want the offense to go 3 and out. That can be difficult versus many of these offenses. The power running offense is predicated upon keeping the chains and clock moving. Before I get into the Down and Distance strategy for the defense, I will first look at the strategy for the offense.
Power Running Strategy
On first down the offense is happy getting 4 yards and into a second and medium situation. If they happen to get into a second and short situation they will be really happy. Second and short is the best down for the offense; this is where they will use play action passes and other plays with big play potential mixed in with enough running plays to keep the defense off balanced. If the offense ends up in 3rd and short, they are comfortable running any of their base plays. They feel they can get 4 yards at will with this offense. What they want to avoid at all costs is the dreaded 3rd and long. In this down they can't consistently rely upon their running plays to get the necessary yardage, nor can they utilize their play-action passing game effectively. The options they are usually left with are: 5-step passing, Sprint out passing, screens, draws, and a maybe a spread package. These things are outside the comfort zone of their offense. In short, the power run offense tries to avoid 3rd long more than other offensive systems.
Defensive Strategy
The goal of the defense should be to get the power running offense into a 3rd and long situation. How is that accomplished. Simple by getting the offense to gain 2 yards or less on 1st and second down. OK, its not that simple, but that's the general idea. The best thing the defense can do is get the offense to gain 2 or less yards on 1st down. This will put the offense into second and long, again this is a down that the offense wants to avoid, because it makes 3rd and long a real possibility. The offense has pressure to move the ball on second and long.
The general point is, you want pressure on the offense on 2nd and 3rd down. To accomplish this, you have to be aggressive on 1st down. This is the down to be aggressive versus the run. Most power running teams are not going to go for a pass or play pass on 1st down (unless they feel its high percentage). Because an incomplete pass immediately puts pressure on the offense. They don't want to pass unless its high percentage.
The goal of the 4-2-5 versus power running teams is to get them into a 3rd and long situation.
5. Play to get 3 and outs early in the game rather than later in the game.
This is especially true if you have a decent offense on your team. If you get them to go 3 and out on its first 2-3 drives, while at the same time score 10 or more points, then you have put them in a bad position. 1st, they won't have enough plays run yet to be sure of their adjustments. 2nd, they will not be controlling clock, which is a big part of their scheme. 3rd, they will be playing catch up with a ball-control based offense. If they are down by 10 points or more, then they are gonna have to play more aggressive themselves, this usually leads to turnovers and even more mistakes because they are stuck doing something that they are not as comfortable doing as they are in the running game.
In the next part we will look at the application of these principals by using alignments and techniques versus the double tight I.
This is part III of the series on Bracket Coverage. You can read Part I and Part II to get caught up to speed.
Combination brackets are match style brackets. At times the coverages can appear like quarters coverage after the pattern distribution. The difference between combo brackets and match-up zone, is the more aggressive man nature of combo-brackets.
I use the term combo brackets for these coverage because they usually involve bracket concepts combined with a man read concept. Before I get to confusing about the whole process, lets jump in a look at 3 different combination brackets. COVER BLACK
I have already discussed this coverage previously, but it is the first and easiest combo bracket to understand.
This coverage involves "cone"and "bracket"technique put together. The SS is playing out and up on #2 and the corner is playing out and up of #1. The FS is in the read technique. He is looking to cut and match the 1st inside cut of speed. The Bracket concept becomes clear when the 1st inside cut of speed occurs. If the slot is the first cut, the coverage works like "bracket" if the #1 WR is the first cut it plays like cone.
The key to a coverage like this is to know what it is great against. This coverage is designed to stop routes that involved people breaking to the outside. Specifically it can cover double out routes with no problem. Typical sprint out concepts have trouble versus this coverage. For Example:
MIX COVERAGE
Mix coverage combines the two main bracket types, in/out and under/over.
This is confusing for the quarterback and offers bracket coverage on both #2 and #1. This coverage is trying to get double coverage on 2 receivers using only 3 defenders. This might sound like a paradox but it really isn't. The underneath routes of #1 are handled by the SS exclusively hence the trail technique. The under routes of #2 will be handled by either the corner of FS. If both #1 and #2 are vertical the FS will be pushing #2 towards him while the SS will force a high throw to the #1 WR. In both cases the QB's throwing window will be an air ball towards a deep corner who will be in position to make a play on either WR.
If #2 breaks in you will have under/over coverage on #1 with the corner and SS:
If #2 breaks out, the FS will play #1 over while the SS plays under.
If the #1 WR breaks off his route the SS will take him, and you will have the FS and corner playing #2 in and out.
You can see this coverage is strong versus underneath routes. The major benefit to this coverage is that it can be disguised easily. SQUEEZE COVERAGE
Squeeze might be my favorite combo-bracket of all.
I don't want to get redundant, but if you understand the principals behind the other coverage I have discussed in this article, then this should make sense. This is simply a combo bracket that closely resembles a pattern read cover 2. The corner is M/M out and up of #1 unless #2 works out. Essentially "Cone" with a read on #2. The SS is the inverse of the corner. Essentially playing deuce with a read on #1. The FS is looking to double the first up field route or split the difference between double verticals.
This bracket squeezes both WR's and allows most vertical and interminably routes to be played effectively. The problem routes are those that involve both WR's working in or out.
I am sorry these posts are coming out later than expected. Off-season, power-lifting, and standardized testing are in the full swing of things. I am looking to do more work on split safety zone blitzes, playing the power running game from the 4-2-5, and scheming empty formations. Is there anything anyone in particular is interested in reading about? Leave a comment if you have a suggestion; I want to write about stuff that people are interested in most.
One of the most pivotal plays of the Rose Bowl was Tank Carder's tipped pass on the Wisconsin failed 2 point play. The crazy thing about football is that Wisconsin had the right play at the right time, but still came up short. At the same time TCU was not in too bad a defense for the situation, and despite two major mistakes, they managed to keep Wisconsin out of the end zone. In this post I will examine TCU's DOG Package and analyze the Dog call on Wisconsin's two point conversion attempt.
DOG BASICS
The Dog package at TCU is a simple concept. 4 Guys are bringing pressure on one side of the offense. The usual way to run it is to bring a safety and linebacker from the same side. This creates enormous pressure and will likely leave at least one person free. In the TCU system a "Dog" call is a combination of a "Bullet" (backer blitz) with a "Smoke" (Safety Blitz). Man coverage is run behind it. The man rules are easy: The FS covers the #2 WR to the side of the dog, the corners cover the most outside guys. The other linebacker accounts for a back, and the WS accounts for a 4th WR or another back. Lets look at some examples.
If you don't understand the jargon of the call here is a quick explanation. The first "T" Refers to the way the 3 Technique will be set. "T" Means he will align towards the TE (Y). The second "T" Refers to the side which the blitz will be run from, this is also the TE side. Dogs is the type of blitz that is being run, and the "A" at the end is the gap the linebacker is assigned to run through.
The Left Corner has the Z, the FS has the Y, the WS and Mike will work off on the backs and the right corner will cover #5. This is a pretty straight forward process. This is an easy example. The Use of strength calls and blitz directions is crucial for the effective execution of the DOG package. Lets look at another example versus a 2x2 formation. Here you will see how the double strength calls are needed to get the defense coordinated properly.
Everything should be straightforward except for the "S" in the call. The "S" tells the secondary that the blitz will be coming from the "Split" side which is the side away from the TE(Y). That is why the numbers are reversed in this example.
FIRE TECHNIQUE
The last important part of the Dog call is that D-End to the side of dog is on an Auto-Fire call. The TCU system can tag a Fire call onto a play even if it is not Dog blitz. However, the fire call is a must when a dog call is on. A Fire call is simply an alert to the D-End that he needs to take an inside rush on the offensive tackle if the tackle pass blocks. If it is a running play he just attacks the C-gap. This allows the offensive tackle to get into a lose-lose situation that results in somebody coming free on the DOG. Here is an example.
DOG CALL VS WISCONSIN
Lets look at the Dog call that was used versus Wisconsin on the 2-point conversion attempt. The call is F-Tag W-DogsB. (I am not sure if this is the exact wording that TCU used but it will suffice for the example.) From the offensive perspective, Wisconsin aligned in a TE trips formation.
Versus this formation the blitz and assignments woulds look like this.
The "Tag" call is to the D-Tackle, alerting him to slant into the A-Gap. Usually on Dog calls versus trips, TCU will elect to make a "switch" call and simplify the coverage via alignment. A switch call looks like this. The "F" call sets the 3-tech to the field, and the "W" means "wide" as in run the Dog from the wide side of the field. (The secondary works off the wide/short concept, as the front uses Field/Boundary.)
Versus a pass the "switch" call is much better because of the alignment of the safeties. However, it is not as good versus the run. Any cutback or run away from the Dog would score easily. Given that Wisconsin was pounding TCU all night, this would not be the best way to run a Dog. TCU probably elected not to go with the switch call, because they wanted to remain stronger versus the run. (by keeping a linebacker in to play the weak-side run). (This is just speculation.)
You can see this alignment and assignment is more sound versus the run then the "Switch" call would have been. What you will see in this play, is that TCU makes two big mistakes on the execution of the blitz. One in the coverage, the other on the actual pass rush.
Coverage Error
The Weak Safety for TCU #9 Alex Ibiloye fails to cover the #3 wide receiver on the settle-out route.
This left a receiver wide open . Starting with alignment, the Weak Safety was in bad shape, even if he did try to cover the #3 WR he was out of position to cover the particular route the receiver ran. TCU has shown on blitzes that their players will stem to effective alignments regardless if it is safety or linebacker in coverage.
If you look at the highlights, you can see Gary Patterson pointing and yelling after the play was over. Like any good coach he was more concerned with correcting errors than celebrating one of the biggest defensive plays of his career.
Blitz Error
The blitz error was more subtle and shows that the person who made the second best effort on this play (behind Tank Carder) was the right tackle #58 Ricky Wagner. Lets look at the Wisconsin protection scheme.
Wisconsin used a 4 man slide to the right to pick up the TCU blitz. This should not be problem for the DOG blitz, because 5 men will be coming with only 4 to protect. (4 From the dog side plus the nose).
Just looking at the side of the Dog, someone should be free. Even if the Wisconsin center and guard pick up the D-Tackle and Sam Backer (which they did) the tackle should be in a lose-lose with the D-end and SS. The breakdown happens here. Wagner made a great play by pushing the D-End down to the ground preventing the end from cutting inside of him, and then came off to block the SS #28 Colin Jones. It was impressive.
I have not seen nor think I will ever see an O-Line coach expect one his linemen to block 2 guys like this. It goes to show how good the Wisconsin offensive line is. Here is the highlight of the play.
Even though Wisconsin had the right play called and did a great job protecting it, it still comes down to play-makers. Tank Carder got blocked and saw the QB get ready to throw, then did what play-makers do, make plays! He bats the pass down and essentially seals the win for TCU.
"I was definitely on the blitz," Carder said. "We thought they were going to run. Coach [Gary] Patterson put me on the blitz. I got blocked so I stepped back and he [Tolzien] cocked his arm back and I jumped up and swatted it down."
CONCLUSION
This post was in no intended to downplay TCU and the game they played. They showed that they are the #1 Defense in the Nation. Its a tribute to them that even on a play with a couple of busted assignments, they can still find a way to make plays.
The Dog Blitz is very effective and great versus the run and pass. TCU blitzed a lot in this game, and they needed too. Wisconsin was pounding the ball better than anyone I have ever seen against TCU. The frogs played the run aggressive all night, and not just by blitzing. The safeties were in hard flat-foot reads that ended up with tackles close to the LOS. The top two tacklers from the game were safeties. #28 Colin Jones and #3 Tejay Johnson each had 10 tackles. It was a big win for TCU and for the 4-2-5 defense in perhaps the biggest stage the defense had ever been on.


 The call is TITE-2 SKY. The front can set the strength either way, the ideal situation is to have it set towards the WR side. However, you can't always count on that; motion will have jumping and shifting all over the place. The read side is normal, nothing has changed. The FS, SS, Corner, and front align like they versus regular pro-I. The away-side is where things change. The WS shifts to a tighter alignment (anywhere from 1x1 to 5x5; it really depends on the player) angled in 45 degrees. He is the force player. The corner is aligned 4-6 yards behind the DE. Finally the nose shifts to an inside shade on the guard versus the TE. (You could put the corner in force alignment and stack the WS behind the DE, all you would need to tag is TITE-2 Cloud)


